Collections in Java
Collections in java is a framework that provides an architecture to store and manipulate the group of objects.All the operations that you perform on a data such as searching, sorting, insertion, manipulation, deletion etc. can be performed by Java Collections.
Java Collection simply means a single unit of objects. Java Collection framework provides many interfaces (Set, List, Queue, Deque etc.) and classes (ArrayList, Vector, LinkedList, PriorityQueue, HashSet, LinkedHashSet, TreeSet etc).
What is Collection in java
Collection represents a single unit of objects i.e. a group.
What is framework in java
- provides readymade architecture.
- represents set of classes and interface.
- is optional.
What is Collection framework
Collection framework represents a unified architecture for storing and manipulating group of objects. It has:- Interfaces and its implementations i.e. classes
- Algorithm
Hierarchy of Collection Framework
Let us see the hierarchy of collection framework.The java.util package contains all the classes and interfaces for Collection framework.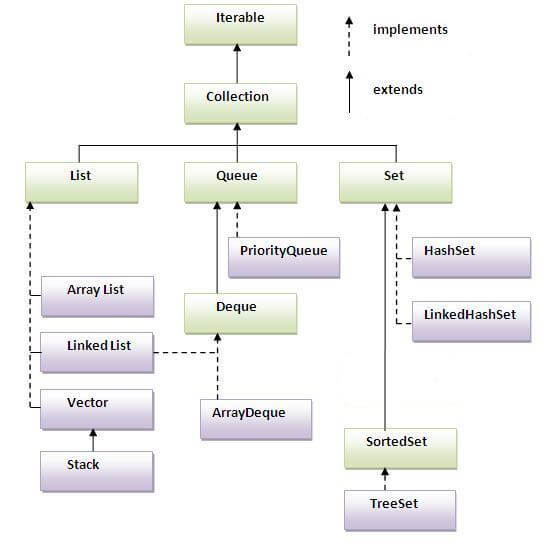
Methods of Collection interface
| No. | Method | Description |
|---|---|---|
| 1 | public boolean add(Object element) | is used to insert an element in this collection. |
| 2 | public boolean addAll(Collection c) | is used to insert the specified collection elements in the invoking collection. |
| 3 | public boolean remove(Object element) | is used to delete an element from this collection. |
| 4 | public boolean removeAll(Collection c) | is used to delete all the elements of specified collection from the invoking collection. |
| 5 | public boolean retainAll(Collection c) | is used to delete all the elements of invoking collection except the specified collection. |
| 6 | public int size() | return the total number of elements in the collection. |
| 7 | public void clear() | removes the total no of element from the collection. |
| 8 | public boolean contains(Object element) | is used to search an element. |
| 9 | public boolean containsAll(Collection c) | is used to search the specified collection in this collection. |
| 10 | public Iterator iterator() | returns an iterator. |
| 11 | public Object[] toArray() | converts collection into array. |
| 12 | public boolean isEmpty() | checks if collection is empty. |
| 13 | public boolean equals(Object element) | matches two collection. |
| 14 | public int hashCode() | returns the hashcode number for collection. |
Iterator interface
Iterator interface provides the facility of iterating the elements in forward direction only.There are only three methods in the Iterator interface. They are:
- public boolean hasNext() it returns true if iterator has more elements.
- public object next() it returns the element and moves the cursor pointer to the next element.
- public void remove() it removes the last elements returned by the iterator. It is rarely used.
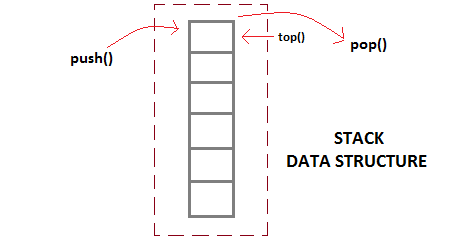
Java ArrayList class
- Java ArrayList class uses a dynamic array for storing the elements.It extends AbstractList class and implements List interface.
- Java ArrayList class can contain duplicate elements.
- Java ArrayList class maintains insertion order.
- Java ArrayList class is non synchronized.
- Java ArrayList allows random access because array works at the index basis.
- In Java ArrayList class, manipulation is slow because a lot of shifting needs to be occurred if any element is removed from the array list.